
Adding a Custom Inspector Palette
You have the option of providing a separate floating palette that can aid the user in working with your DropTool. If you add a substack to your DropTool stack named "<dropToolType> Inspector", this stack is displayed as a palette whenever the user chooses to show it. Here's an example of the inspector displayed for the stsImageWell control, that has a custom property that drives what image type(s) it will accept: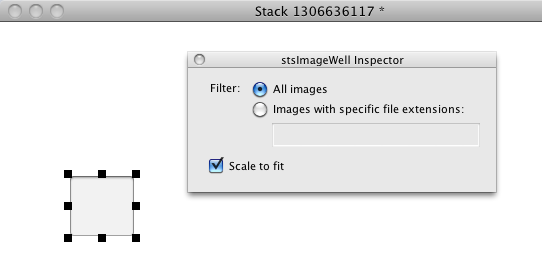
revSelectedObjectChanged
message to any open
Inspector palettes whenever the selected object changes on the user's stack. So if you decide to include an inspector palette,
you can update it based on the currently selected object(s).
You really only want to take action if the selected object matches the DropTool "type" managed by the Inspector. To check this, you
can examine the uDTType
property of the selected object and then enable or disable your controls based on
what it returns (see below for how to do this).
Best Practices
In order to be consistent with other DropTools, it is recommended that you follow these simple guidelines:- Put all of the controls that adjust the custom properties of the selected DropTool inside a group (so you can enable and disable all of the controls at once, as needed).
- If the user selects an object that is not being managed by your Inspector palette, reset all controls to their default values and disable the group in the Inspector.
- If the user deselects all objects, reset all controls to their default values and disable the group in the Inspector.
- Avoid an "Apply" button: when the user makes a change on the Inspector, immediately apply it to the selected DropTool.
DropTool Template Inspector
substack that accommodates the
first three items in the list above:
on preOpenCard
  --|
  --| Initialize your inspector here
  --|
  ResetCard
  revSelectedObjectChanged  -- act on a selected object if there is one
end preOpenCard

on ResetCard
  --|
  --| Clear out/reset all of your card controls here
  --|
end ResetCard

on revSelectedObjectChanged
  put line 1 of the selectedObjects into tObj  -- assumes you only want to work on a single object
  if tObj <> "" then
    --|
    --| The DropTools Palette will send you the revSelectedObjectChanged message when *any*
    --| object is selected; it's up to you to determine if the selected object(s) should
    --| update your inspector palette or not.
    --|
    --| DropTools helps you with this by automatically setting a "uDTType" property on all
    --| dropped controls to the name of the control that was dropped. Replace the "yourObjectHere"
    --| string below with the name of your custom control:
    --|

    if the uDTType of tObj is "yourObjectHere" then
      enable grp 1

      --|
      --| your code goes here
      --|

    else
      ResetCard
      disable grp 1
    end if
  else
    ResetCard
    disable grp 1
  end if
end revSelectedObjectChanged